Recipe-ish: How to Feed a Sourdough Starter

I’ll be posting a sourdough bread recipe soon but in order to make that bread, you need to know how to refresh sourdough starter. Here’s my method.

Step 1: Get some sourdough starter.  This is easier than it sounds.  Anyone who bakes with sourdough should be willing to give you some.  A very generous baker friend gave some to me and (I think) she got it from the baker at Atwaters, here in Baltimore. She walked into the bakery and asked to buy some and it was just given to her.  If you’re in Baltimore and you want some starter, leave me a comment and I’ll be glad to give some to you.  I have some extra whole wheat starter in my fridge right now!  If you’re not close enough to get some from me, be brave and ask around.  I’m sure you’ll find either a home or professional baker who will be glad to give you some.

You can also start your own starter.  Here’s one way of doing so. Finally, you can buy some starter online. I would choose this option last, just because it’s more fun to have some starter with a story behind it.  But if you do want to buy starter, this is one place you can get it.

Step 2 – Refresh/make enough starter:  The night before you want to make bread, mix equal parts (by weight) of starter, flour, and water.  If you have 200 g of starter, you will need to add 200 g each of water and flour.  Stir really well, incorporating lots of air, cover with a damp cloth, and allow to sit overnight at room temperature. You’ll know it’s ready if it smells sour (good sour!) and is bubbly all the way to the top.  Also, you’ll be able to tell that the texture has changed.  When it’s first mixed up, it us relatively grainy from the flour and fairly thick. When it’s ready, it looks pretty smooth and flows smoothly.

001 (800x533) (3)003 (800x533) (3)
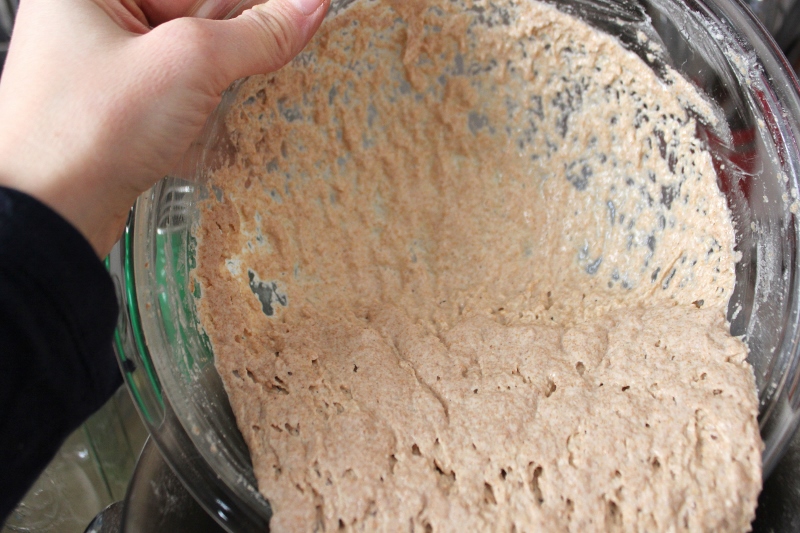
This is what it looks like when it’s ready, as I’m pouring it out into my mixer bowl.

If you are starting with a small amount of starter, you may need to follow this process 2-3 times until you get to the volume that you need to both make your recipe and save some for next time.  (See step 3.)

Step 3: Before you use it all up for baking, TAKE SOME OUT to save for next time!!  I usually save around 320-350g of starter, which (when refreshed as in Step 2) makes just enough for my bread recipe and leaves around 320-350g leftover to save in the fridge for the next time.

Step 4: Put your seed starter into a glass jar, cover tightly, and put it in the fridge.  It should easily last a month or even longer between feedings.  I bake with mine at least once every two weeks.  Leaving it much longer makes me nervous because I’ve managed to keep mine alive for over two years now, which feels like a major accomplishment! (Although, really it’s not because there are starters out there that are supposedly over 100 years old.)

Step 5: Bake your bread!  I’ll be posting a recipe soon for a super-easy, hands-off 100% whole wheat sourdough bread, which we eat for breakfast almost every day.

Some other items of note:

1. If you have a whole wheat starter, be sure to feed it with whole wheat flour; if it’s a white flour starter, feed it with white flour.  This isn’t a hard and fast rule but I do maintain two sourdough starters – a white flour one and a whole wheat one.

001 (800x533)

2. If you’ve stored your starter in the fridge for a week or longer, you’ll notice that there is dark liquid that has separated out to the top of the starter.  This is totally normal.  It’s alcohol from the fermentation process.  I just pour it off, discard it, and then proceed with Step 2.  Some bakers stir it back in.  That’s your choice.

002 (800x533)It’s been around a week since I baked with this.  When I’m ready to bake with this again, I’ll pour off that dark liquid.

3. Don’t forget to save some starter for next time.  Forgetting to do this is my nightmare. So I’m going to warn you about it twice in the same post.

4. This is just my method for maintaining my starter.  There is lots of advice out there for what to do with sourdough starters.  Here are a few more articles for more reading if you’re interested:

Posted in baking, recipe | Tagged , | 3 Comments

Finish Up Friday: 2015 Edition, Update #1 – I accomplished a few things! (Plus – THIS COLD!!)

Of course, I didn’t work on the dining room shades this week (did anyone really think that I would?) but I did sew a few other things.

What I accomplished this week:

  1. I fixed my black tank top.  The strap had gotten stuck in the washing machine.  It was an easy mending job, one I had no reason to put off for months and months, except that I hate mending.
  2. I sewed the last few details on Mark’s doll’s clothes.  I forgot to put this on my original list but I started them in July so they definitely count as a WIP!  I also made some good progress on the doll hair base but I still have a couple more rows of that plus I need to add the actual hair.  003 (800x533)
  3. I fixed the living room shade.  Basically, I had to rip out the Velcro at the top and let out the hem to add about another inch to the length to accommodate the window of our new door.  Now I just have to get it installed on the door.
  4. I also sewed a manger scene and wrote the tutorial.  That’s an item off my “what I really want to sew” list but I couldn’t resist!

The List (as of 2/20/2015) – It’s longer than last week because, of course, I remember more things I have to do.

  1. Add Mark’s doll hair and the feet too (this is a project that will never end)
  2. Quilt the table runner that I almost finished last spring
  3. Fix the office shade that just keeps breaking
  4. Finish the dining room shades that I have been avoiding for 3 YEARS
  5. Fix the ripped gray skirt.
  6. Hem Nik’s new gray pants.
  7. Alter Nik’s Under Armour shirt so it fits him.

I’m linking up with Finish It Up Friday at Crazy Mom Quilts. I’ll be back next Friday to let you know how I’m doing!

**********

And on a complete unrelated note, this cold is insane! I was supposed to be -2 last night and I think tonight’s low is predicted to be 3.  I feel like I’m back home, or at least in Anchorage.  The cold is nothing like it was in Glennallen but it’s definitely a cold winter day in Anchorage here!  The ice was way up our windows this morning when we opened the blinds.  I had forgotten how lovely the frost is when the sun comes through your windows.

002 (800x533) 001 (800x533)ice all the way up to that line that I drew

Posted in sewing | Tagged | Leave a comment

Tutorial: Baby Jesus in the Manger (a felt ornament for your Christmas tree)

I realize it’s February but last fall was crazy, so you’re getting your annual Christmas ornament tutorial three months late.  Better late than never, right?

This year, I decided that we should add a manger to the nativity scene that we’ve been sewing over the past few years for our church’s annual ornament sale.  We’ve already made a star, an angel, and a sheep.  I used this ornament as inspiration but the design is my own.

While they were there, the time came for the baby to be born, and she gave birth to her firstborn, a son. She wrapped him in cloths and placed him in a manger, because there was no guest room available for them.

Luke 2:6-7

I hope you enjoy making this manager scene!

016 (800x800)

Supplies you’ll need to make one manger scene:

001 (800x533) (2)

  • small amounts of light brown and light blue felt plus one small piece (not pictured) and two larger pieces of dark brown felt. The larger pieces of brown felt need to be able to fit all three pieces cut from the templates on them. (I prefer premium acrylic felt for making ornaments.  They end up feeling much nicer.  Wool felt would be even better)
  • light brown, light blue, and dark brown embroidery thread to match your felt
  • one 8-inch piece of narrow white ribbon
  • the templates and thin cardboard to make the templates sturdier, if desired (Click here – Baby Jesus in the Manger templates  – to download the Word file that has the template in it.  You can modify the size for a bigger or smaller manger. Click here – Baby Jesus in the Manger templates – if you want the template as a PDF.)
  • permanent marker, needle and sharp scissors
  • Instructions for a knot-less start for thread (so EASY!) are at the bottom of this post.

Instructions (or “constructions” as Ellie calls them!):

1. Using the templates, cut out one head in light brown, one blanket in light blue, and one manger in dark brown.  If you’d like, you can trace the shape onto the felt using a permanent marker.  If you do this, be sure to cut just inside the marker line so that the marker doesn’t show on the ornament.  Otherwise hold the template to the felt and cut out the shape.

2. Arrange all three pieces on one larger piece of the dark brown felt.  Make sure they can fit comfortably, i.e. that your large piece is large enough.

002 (800x533) (3)

3. Using dark brown thread, a knot-less start, and a running stitch, sew the manger to the bottom of one of the larger pieces of dark brown felt.

003 (800x533) (2)

4. Prepare to sew on the blanket.  The two sides of the blanket are curved slightly differently.  One is to nestle next to the head and one is the “feet”.  Make sure you place the blanket correctly on the manager.

004 (800x534)wrong!

005 (800x534)right!  You’ll probably notice that the curves don’t match up exactly, even when you have it arranged correctly.  That’s because felt is impossible to cut completely accurately, particularly when curves are involved.  That’s OK.  We’ll fix it when you sew on the head.

5. With light blue thread, start by sewing along the bottom edge of the blanket, to assure that you are sewing it securely against the manager. Then sew the rest of the way around.

006 (800x534)6. [No picture for this one.] Using light brown thread, sew on the head.  Make sure you push the head up against the blanket, so that it fits snugly.  You may have to push it a little out of shape to get the curves to fit correctly.

7. Place the second large piece of dark brown felt against the back of the first piece.

007 (800x533) (3)

Cut around the perimeter of the sewn pieces so that there isn’t any extra brown felt showing.

008 (800x534)

Alternately, if you are finding it too difficult to cut both pieces at once, just cut around the shapes sewn onto the first piece of felt, place that onto the other big piece of brown felt, and cut out that one.

8. Separate the two pieces.  Fold the ribbon in half to form a loop and sew the two cut ends to the inside middle, somewhere around the top of the blanket. (See the end of this tutorial for a bonus tip about ribbon arrangement.)

011 (800x534)

9. Place the back piece of dark brown felt into place and sew the two parts together.  This part is a bit tricky because you can’t go through to the front layer when you’re sewing.  You want to catch only the two dark brown layers.  There are two ways I found to do this.

First, you can push your needle into and out of the felt, putting one complete stitch on your needle before pulling it through. I found that this worked well on the straight and slightly curved sections.

012 (800x534)

Alternately, when you are working on the curves or turning corners, I recommend pushing the needle out between the top and middle layers and then going back in again. It gives you a bit more control as to where the needle goes.

013 (800x534)

When you’re finished, tie off your thread and you’ll have a completely dark brown back and a lovely front.  You sewed a manager scene! Ta da!

014 (800x534)

**********

Bonus: How To Loop Your Ribbon

This may seem a bit obsessive (because it probably is) but I have sewn so many ornaments over the past few years, I’ve had time to get obsessive. I’ve found that I prefer to loop my ribbon in a particular way in order to allow the ornament to hang more nicely on the tree.

There are two options when you are getting ready to sew on your ribbon.

1. [NOT recommended!] Fold the ribbon in half, and place the pieces together.  (This is the way you probably would do it if you’re not obsessing about it.)

009 (800x534)

2. [This is the BEST way!!] Fold the ribbon in half, give one side a twist, and then put the two pieces together.  This makes the two ends lie flat, makes it easier to sew onto the felt, and also allows the ornament to hang facing the correct way on the tree.

010 (800x534)Try it! It will make your ornament sewing life at least five percent better! 🙂

Posted in sewing, tutorial | Tagged , , , , , | 2 Comments

Brotherly Love – So Cute! (It didn’t last long.)

This morning, Mark gave Ellie a nice little hug just before breakfast.

002 (800x533) (2)

As usual, however, things got a little crazy…

003 (800x533)…and then they fell apart.

004 (800x533)Sibling love! It’s the best! 🙂

Posted in Ellie, Mark | 2 Comments

The Four-Month Change – It’s Not You, It’s Your Baby’s Brain

Four months is a time of really major change for most babies.  It’s the end of the “fourth trimester” as each baby emerges from the newborn “eat, sleep, poop, eat, sleep” phase and enters real life.  Ellie threw us (but particularly me) for a loop when she turned four months.  Basically, her sleep habits (particularly in the daytime) changed drastically and I  struggled for several weeks to figure out the “new” Ellie.  I blogged about it here.  A couple months after Ellie turned four months, I found this blog post with some wonderful information about 4-month0olds.  In that blog post, she links to this blog post about sleep regressions (which she doesn’t like the term for) and 4-montholds, which I really wish I had read before Ellie turned four months.

IMG_1450 (800x600)Ellie, at four months (love that peacock dress! And remember the hippo in a tutu?!)

I try to remember to send these links to all the new moms I know because sometimes just having a little information makes it a lot easier to roll with the changes.  When everything I’d known about Ellie and her sleeping habits changed around four months, I thought I was doing something wrong.

Here is, verbatim, the email that I sent to the attachment parenting group that I’m part of when just turned four months old,

Last week, Ellie (who just turned 4 months) decided that she was not willing to take a nap unless she was being held.  And so for almost a week, either my husband or I have had to hold her in order for her to get any sleep during the day.  My husband is a teacher so he was home for three days last week, which made life MUCH easier. And yesterday’s snow day was a blessing too.  But all of this holding is wearing me down and I didn’t realize how much the break that I got while she napped meant to me.  Dr. Sears says that it takes a baby about 20 minutes to drop into a deep sleep and so if we rock her for that long, she will at least stay asleep when we put her down.  But that only lasts for maybe 5 minutes before her eyes have popped open.

So here’s my question – is this my fault?  I tried my best to get her to take naps by herself and she was doing great until last Thursday when all of a sudden, she just changed.  Is this just a stage?  Do I just have to get through it?  Is there something I can do to help her learn to sleep by herself again?  I wear her in a Moby wrap a lot but she rarely is willing to fall asleep in it and when she does, she only sleeps for a few minutes.  Even when we’re holding her, we’re happy if she sleeps for 45 minutes.  So she’s definitely not “consolidating” her sleep like she supposedly should be doing now.

She thankfully is still sleeping fine* at night.  It’s just daytime naps that are hard.

Thanks for any advice you might have.  I’m starting to feel a bit desperate.

See that question? “Is this my fault?” To a person, the answers that I got back from that group were full of love, grace, and truth.  They said, “No, it’s NOT your fault. There’s nothing wrong with her or you. Your baby is lucky to have a mama and daddy who is trying to meet her needs. This is very normal for a four-month-old.” One mom suggested that I read this article about wakeful four-month-olds. Another mom even said, “What? Babies can nap without being held?” 🙂

Basically, I just needed someone to tell me that it was OK, that things would get better, that I wasn’t spoiling my child by holding her, that what she needed was for me to respond to her needs, that eventually I would be able to put her down, and most importantly that I wasn’t a failure as a mother.  For Ellie, it took her until she was around 9 months old before she was napping consistently on her own.  That year, I read 140 books because I was sitting still so much!  (You can read about all those books in these posts: fiction, memoir, Ruhlman/Gladwell, sewing/cooking/DIY, parenting/marriage, learning about almost anything, and my top four favorite books.)

So, if you have a baby approaching four months and you’re starting to see some changes, let me say to you:

It’s OK.  Every** baby goes through this.  The sleep part is hard, so hard, but wow, a four-month-baby is so much fun in so many other ways! You haven’t done something wrong. Respond to your baby in the way your mama-heart tells you is right and good.  You will get through it and definitely ask for help if you need it.

**********

Two caveats:

*In that email, when I wrote, “Ellie is still sleeping fine at night,” please don’t interpret that to mean “sleeping through the night”.  She was still probably nursing at least 2-3 times during the night, if not more.  It’s just that her night-time sleep didn’t really change.  She wasn’t one of those mythical babies who slept through the night at six weeks.  For many babies, however, they do sleep for longer stretches at night at first and that tends to change as well around four months.

**Technically speaking, every baby goes through the four-month change but I do have to say that I didn’t even notice it with Mark.  The poor guy was just carted around everywhere with Ellie and I didn’t have the luxury of worrying about his naps the way I did with Ellie.   I did notice that he started napping on his own around five months.  I was anticipating an Ellie-like nap experience, so I was thrilled when he started napping on his own so soon. 🙂 It’s all about your expectations in so many ways!

005 (800x533) (2)Mark, during one of those treasured “out of my arms” naps, at four months

Posted in Ellie, Mark, nursing, parenting | Tagged , , | 2 Comments

Start The Bread Tonight! Eat This Tomorrow!

We made and devoured this amazing Afghan-style pumpkin with meat sauce tonight and it was incredible. For those of you’ve who have eaten at the Helmand here in Baltimore, it’s very similar to their pumpkin dish (kaddo borawni) but with a meat sauce added.  Nik and I think it’s better than theirs actually but that might be considered heresy in Baltimore so I won’t make that definitive statement. 🙂

The recipe has directions for making it vegetarian also if you’d prefer that.  The yogurt sauce (which Mark called tzatzik!) is such a nice cool contrast to the other warm flavors in the dish.

002 (800x533)so incredible I forgot to take a picture until it was almost gone!

We ate it with some Afghan flat bread that was super easy to make.  The only difficult part was remembering to start the dough the night before.  That’s why we ate the meal a week later than I’d planned.  Soaking up the broth from the pumpkin with this bread definitely my favorite part of the eating experience. I didn’t have any of the seeds called for in the recipe so left them out.  I’m interested to find some though and try it with those for the more authentic flavor.

001 (800x533)It comes out of the oven as one giant bubble (which the kids found hilarious) but as it cools, it settles down and becomes “flat” bread. 

I converted it to a soaked recipe, which was easier than usual since the recipe already calls for an overnight developement of a poolish (or, pre-ferment).  I replaced 45g of the water with 45g of yogurt and then proceeded with the recipe as directed.  I ended up letting it rise for closer to four hours becaue our house is pretty cool.  We bake our pizza and flat breads on a baking steel.   It makes INCREDIBLE crust.  If you want to make your own pizza at home, it’s totally worth the investment.  It’s quite heavy to move in and out of the oven but the payoff is amazing food.  (The secret to using it is to preheat it for around an hour at 500+ degrees.  This is a lovely thing to do in the winter because then your kitchen will be deliciously warm.)

If you don’t have a pumpkin or squash to use (we used a butternut squash from a friend’s garden tonight), both Nik and I agree that it would be fine to use pumpkin/squash puree in exchange.  The texture will be very different, of course, but the flavor will be the same.

Definitely add this to your plan for a meal sometime very soon. You won’t regret it.

This post contains at least one affiliate link, meaning any purchases you make with it supports our blog.  See the full disclosure here.
Posted in cooking | Tagged , , | Leave a comment

A Conflicted Valentine’s Day Haiku For You

My old Xanga blog is now available on this blog, and as I’ve been reading back through it, I found a forgotten aspect of my life: haiku writing.  I used to love writing haikus.  So, here’s a 2015 Valentine’s Day haiku for you (here’s some from 2008):

I love you so much!
(Did Hallmark make me say that?)
It’s true, anyway.

I despise Valentine’s Day because it’s such a trumped holiday designed to get us to spend all kinds of money on child/slave-labor-poisoned chocolate, roses flown in with non-renewable oil from Africa, greetings cards which will be read and discarded (and probably not even recycled), plus you feel terrible about yourself if you’re not in a relationship but at least you can feel superior about all the needless consumption just going on and on and you not participating in it and…..

But, in spite of myself, I find myself hugging Nik and telling him “I love you so much even though I hate myself for feeling like I need to tell you this today.” I also just made a chocolate cake to celebrate with my family because, it’s Valentine’s Day! There should be cake!

So, conflicted or not, from our family to you, here’s a lot of non-commercial, no-purchase-required, from-the-heart love!

088 (640x640)


Posted in just for fun | Tagged | 1 Comment

Finish Up Friday: 2015 Edition – Look! Ellie’s Doll Has Hair!

In January/February 2014, I had a very productive two months as I held my “list of shame” up for public view, keeping you updated as to how I was doing with all my unfinished sewing projects.

I had good intentions of doing the same for February 2015 but here we are, halfway through February and this is my first “Finish It Up” post.  Although you haven’t know about it, even the threat of doing this has been good for me. I do have some finishes to report along with a long list of work still yet to be done.

First – the real list of shame:

The [So Close to Being Done] List of WIPs (as of 3/14/14) – down from 15!

  1. Ellie’s doll hair
  2. dining room Roman shades
  3. hem new corduroy pants

Of those three things, only two of them have been finished in the last eleven months.  Ellie’s doll hair, I did indeed finish last spring.  My new corduroy pants? I hemmed them this morning. (Nothing like the threat of confessing abject failure to get something done!) But, why oh why can I not find he will power to finish those shades?!?!

008 (640x426)Our rule for Baby’s hair is “always in a pony tail or pigtails”, otherwise, I know the yarn would get trashed.  It’s held up pretty well so far.

009 (640x427)bangs! 🙂

Here’s another finish I can cross off my list already – one more pillowcase for Mark.

007 (640x427) (2)trains to match his boy blanket

Now that I’ve made myself feel better by telling you what I have accomplished recently, here’s the list of projects I need to finish.

The List (as of 2/13/2015)

  1. Mark’s doll hair, because yay! The doll is done!006 (640x427) (2)a sneak preview of the doll (who is nursing), sans hair. 
  2. fix my tank top (or throw it out if it’s not fixable)
  3. quilt the table runner that I almost finished last spring
  4. fix the living room shade for our new door
  5. fix the office shade that just keeps breaking
  6. finish the dining room shades that I have been avoiding for 3 YEARS

Once I do all of that, here’s what I really want to be sewing this year:

  1. A big-girl quilt for Ellie. She wants rainbows.  (She’s outgrown her first quilt. Sniff!)
  2. backpack for Mark (poor neglected second child)
  3. four more crayon rolls, for Mark and presents
  4. apron for Mark (like Ellie’s)
  5. a surprise project for a special friend of ours
  6. hot pads for us (like Mom’s) (and a blog tutorial)
  7. manager ornament (and a blog tutorial)
  8. tutorial for the felt string of Christmas lights
  9. Ellie’s Easter dress
  10. headbands for Ellie
  11. napkin rings for our table
  12. bath towel capes for Ellie and Mark
  13. clothes for me (particularly I want to take a Craftsy class that I purchased recently, about altering patterns, which will result in a new summer dress for me)
  14. purse for me because my Tabitha bag is just about worn out

And if I get all of that done between now and two years from now, it will be a miracle. 🙂

P.S. You may notice that what is not on either list above is Ellie’s “to be finished after Christmas” Christmas present.  I showed her the book recently with the project I wanted to make for her (a hooded play cape) and she told me quite definitively that she doesn’t want one of those things.  So, there you go.  It’s a good thing I wasn’t able to finish it (or even start it) before Christmas!

And I meant to linke up with Finish It Up Friday at Crazy Mom Quilts but I forgot to do it. I’ll be back next Friday to let you know how I’m doing!

This post contains at least one affiliate link, meaning any purchases you make with it supports our blog.  See the full disclosure here.
Posted in Mark, sewing | Tagged , | 7 Comments

Classics Club, Book #12: North and South (from December 2014)

This is my eleventh, and final, post about 2014’s books for The Classics Club (just a bit late).  I’ll be reading one classic book a month through 2018.  Track what I’m reading for the Classics Club here.  I’ll try not to include too many spoilers in my review but I may need to discuss some in order to fully review the book. I’ll warn you if I’m going to mention one.  

North and South by Elizabeth Gaskell

029 (800x533)I promise I read more than the back cover.

  • Year Published: 1854
  • Reread? Or new to me?:  new to me
  • Number of Pages: 450
  • Date Finished: just before Christmas
  • Number of Days it took me to read it: about a week
  • Page/Day ratio:  ???
  • Will I reread this?:  probably not the whole way through but definitely parts

Review: 

Confession #1: I thought this was going to be about the Civil War (sort of like Gone with the Wind) until I started reading it. It’s decidedly not – it’s about the north and south of England. How much more U.S.A.-centric can I get?  Although not about the north and south in America, it did feel similar in terms of some of the geographical stereotypes that we Americans hold (about those “snobby, obsessed-with-work northerners” or those “redneck backwoods southerners”).

Confession #2: Confession #1 is a bit ridiculous because I also knew that this was a good one for Austen lovers to read, when rereading Austen’s novels wasn’t enough.

Confession #3: Although I also knew that this was supposed to be similar to Pride and Prejudice, I didn’t figure out the connection (other than that both are set in the same time period in England) until almost the end of the book.  Once I thought about it, it was obvious but still, it took me a long time to think about it. SPOILER: How about those two marriage proposals? And all the prejudice on her part and pride on his?

Confession #4: This is the only deep thought you’re going to get in this review.  While reading, I was struck by how absurd the main prejudice in the book seemed – that of the educated class against the industrialists, i.e. those in manufacturing and sales.  I am assuming that Ms. Hale’s prejudice against “industrialists” is something that did exist in Gaskell’s time but it’s one I find really hard to understand.  Living in a time when almost everything we own is made/grown/sold by strangers, it seems absurd to think less of those who make the things we use. After all, if those people didn’t make our clothes (and all the other things we own) and grow/produce/sell our food, what would we eat, drink, wear, and use for living?

I know that racial prejudice was alive and well in the 1850s but sadly, it is still alive and well in America today.  I hope and pray that 150 years from now, people will read novels set in our time and have the same thoughts about racial prejudice that I had about industrialist prejudice while reading this book.

Let’s all pray that they say, “Really?  Those crazy people really thought less of someone because of the color of their skin? It was really scandalous to marry someone who didn’t look like you? That really existed? Really? I don’t get it!” And let’s pray that it doesn’t take 150 years to get to that point!

How about you? Have you read North and South? If you’re also an Austen lover, did you find it a satisfying Austen-esque read? I did!

028 (800x533)see? proof I looked at the front cover too! 🙂

 ***************

Would you like to join me in reading The Song of the Lark by Willa Cather in February? I’m to finish the trilogy by reading My Ántonia in March.  After that, I’m going to tackle Les Miserables and will probably allow myself at least a couple months to get through it.

This post contains affiliate links, meaning any purchases you make through them support our blog.  See the full disclosure here.
Posted in books | Tagged , , | 5 Comments

Ellie’s Very Last Baby Present, Mark’s Great-Grandmother’s Hat, and a Cruise to Argentina in 1964

Recently, I pulled out some dress-up stuff that I’ve been saving for when the kids got big enough.  Ellie latched onto a prairie girl bonnet that was made for her as a baby present.  It was the very last thing still waiting to be used from what was showered on us when she was born.  We haven’t started reading Little House in the Big Woods yet but perhaps it’s time, now that she has the hat.  She has fun telling Nik (and whoever else who will listen) that the hat is to keep the sun out of her face when she doesn’t have sunglasses!

022 (640x426)Also on Ellie – my high school senior prom dress! 🙂

Mark has decided his hat of choice is a treasure my dad gave us, a favorite of my grandmother’s.  It fits him remarkably well!

020 (640x427) 018 (640x427)

We have purposely avoided having narrow-focus dress-up clothes in our house (i.e. no fireman or princess costumes), just as we avoid having narrow-focus toys.  The kids are really having fun with these “real-world” items, incorporating them into their play time.  I need to find a few more things for them but I’m glad they have the option of playing with them now.

P.S. We’re storing the dress-up things in two old suitcases that I found at garage sales.

001 (640x640) (2)

I particularly love the larger suitcase.  That label has hints of an amazing story that I will never know but I wish I could!  Also on the suitcase is the customs sticker, verifying that it had passed customs inspection.  That was the best few dollars I’ve spent in a long time, and from a house just a couple blocks away from us!

002 (640x427)Andrew C. Olert, who went on a trip to “Argentena”, sailing in first class from Baltimore on May 13, 1964, staying in Stateroom N 362

This post contains at least one affiliate link, meaning any purchases you make with it supports our blog.  See the full disclosure here.
Posted in Ellie, Mark | Tagged , | 3 Comments