
I’ve been making these crackers for about the last year or so. They solved our “we don’t want to buy crackers but how do you make them?” dilemma. It’s been a bit of a process of learning how to roll them out so that they are thin enough but not too thin. Don’t be upset if you get a little frustrated the first time or two (or three) that you make them. It does get easier with practice! We think these taste surprising cheesy (as if they were full of cheddar) even though they’re actually vegan!
Oregano and Black Pepper Sourdough Crackers
makes at least 12 dozen crackers, depending on how thinly you roll them
heavily adaped from here (Don’t bother using bacon fat as the original recipe suggests. The flavor gets lost in the sourdough and it’s a tragic waste of all that delicious fat.)
1 ½ C (461 g) fresh sourdough starter (If you need some and live in the Baltimore area, let me know. I’d be happy to trade some starter with you for something else.)
¾ tsp teaspoon salt
2 tsp dried oregano
1 tsp freshly ground pepper
6 T (79 g) coconut oil (melted if not already liquid)
Stir together until the oil is completely incorporated into the starter. At first, this will seem impossible but keep stirring and eventually it does mix together.
1 ½ C (195 g) whole wheat flour
Add the flour to the starter/oil mixture and mix well. I usually stir just enough to start the mixing and then dump it out onto a cutting board and knead it a few times until the flour is fully incorporated.
Cover and let the dough sit at room temperature for at least 8 hours. I find that the texture of the crackers are better if I let it sit at room temperature overnight and then in the refrigerator for a day or two. I’m sure there’s a scientific reason for this (perhaps complete hydration of the flour) but it’s also nice to know that you can just let the dough hang out for awhile until you have time to bake the crackers. Once, the dough sat in my fridge for two weeks and the crackers still turned out great!
When you’re ready to bake the crackers, gather your supplies. I bought this awesome rolling pin because my old one was insufficient for rolling our crackers well. My new one is MAGNIFICENTLY easy to use and I love it! It’s well worth the minimal investment and is even made in the USA. You’ll also need parchment paper, a pizza cutter (although a sharp knife could work in a pinch if you don’t have one), and cookie sheets. If you have the kind with only two sides (like mine), this process will be much easier but they’re not required. I reuse my parchment paper many times for cracker making so don’t throw it away!

Divide the dough into six even pieces and roll them into balls. I use my scale for this. Taking one piece at a time, roll it out on parchment paper until it’s extremely thin. I like to press down hard on the rolling pin in the middle of the dough but just press lightly at the edges. This keeps the edges of the dough from getting too thin and ripping. Sprinkle with white bread flour as needed to keep the dough from sticking to the rolling pin.

 part way into the rolling process. As you can see, I don’t worry too much about uniformity around the edges. You could trim them I guess and reroll it but we don’t mind having misshapen crackers.
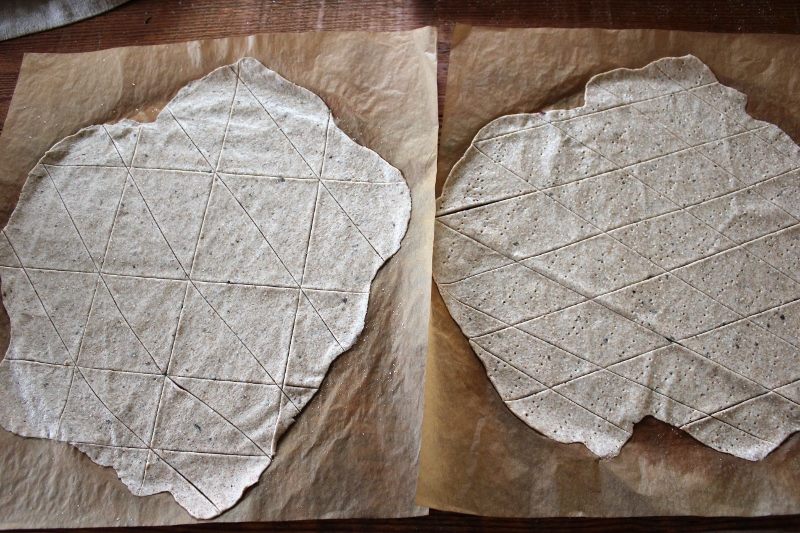
When I think I’m getting close to the crackers getting thin enough, I hope the parchment up to the light. I look for a translucence to the dough – i.e. to see that a good amount of light is getting through. In this picture, you can see that the upper half is still a bit too thick but the bottom half is pretty close to being done.
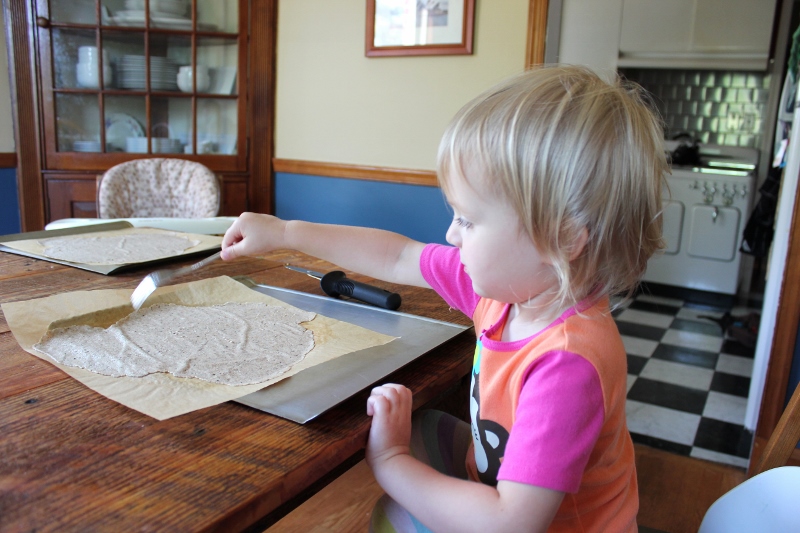
When the dough is thin enough, cut it into cracker shapes with a pizza cutter. I usually just do boring squares/rectangles but you can certainly do triangles, diamonds, or other fun shapes. Prick each square a time or two with a fork to keep it from puffing up. This is usually Ellie’s job! Sprinkle with additional salt if desired and lightly press the extra salt into the dough. (I usually skip the extra salt.)
 These are on the too big side. (I’m not sure why I cut them so big.) Usually I aim for about 2-inch square crackers but I definitely don’t measure. You can cut them to whatever size you prefer your crackers to be.
Slide the parchment paper onto a cookie sheet. Bake in a 350 degree oven for 20-30 minutes, rotating the pans after 10 minutes and checking frequently to make sure the crackers don’t get too brown. There’s a fine line between just crispy enough and so brown that they taste burnt. Cool them on a rack. We store ours in a hard-sided container (rather than a plastic bag) and they usually last 3-4 weeks at room temperature. And yes, I do ration them out – we definitely don’t eat them for snacks!
And, just for fun, here’s the view of the floor from when I took these pictures sometime last summer.The kids are a bit bigger now! 🙂

I’d love to hear what you think of these if you do try them!


Pingback: Why Sourdough? Why Soaked? Why Even Bother? | Salmon and Souvlaki
Jeeze lady you sure can gab..thanks for going to a subject SOAKED that few know about.
Be nice and worth subscribing if you had a print button of just the recipe…. but I get it, you have to explain…everything.
Thanks for the recipe, even thou I have to stare at my phone while making it.