This post is primarily for the other quilters in the #beehiveswarmmerrilee but if you want some paper piecing tips or just are curious about my quilting life, read on. 🙂
This year, for the first time ever, I’m participating in an online quilting bee, organized by Alyce at Blossom Heart Quilts, called The Beehive. I’m the “Queen Bee” for March so this is my post to give instructions to my bee-mates.
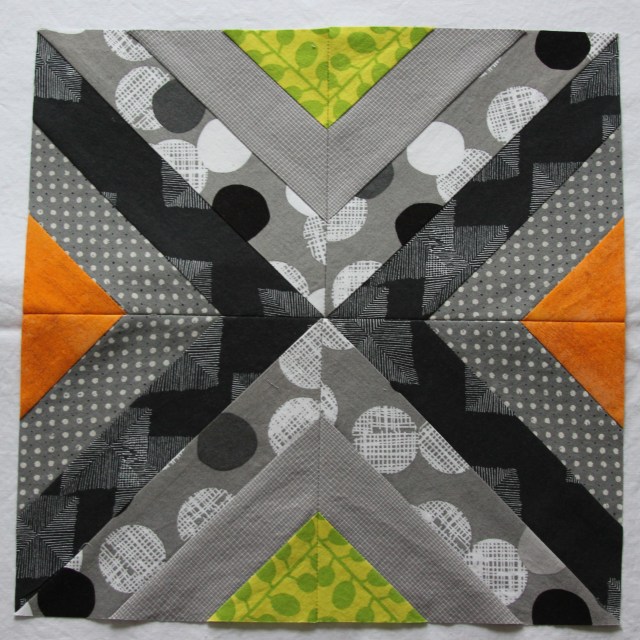
First, my block:
I’ve chosen the “Treasure Hunt” block. It’s paper-pieced but it’s a really simple design with no crazy angles. So if you’re new to paper-piecing, this will be a great first project and for those of you who know how to paper piece, it will be super easy.
Here’s my sample block:
 colors of tools not purposefully matched to colors of block 🙂
Color Choice
I’d like the block to contain a variety of monochromatic grays of different value (i.e. dark gray to light gray). I’d like them to be as close to true gray (if that’s a term) as you can, so not veering into blueish-gray, reddish/purplish-gray, etc. I’d also appreciate leaving out any florals or stereotypically feminine patterns as this is a quilt for my husband and me to share.
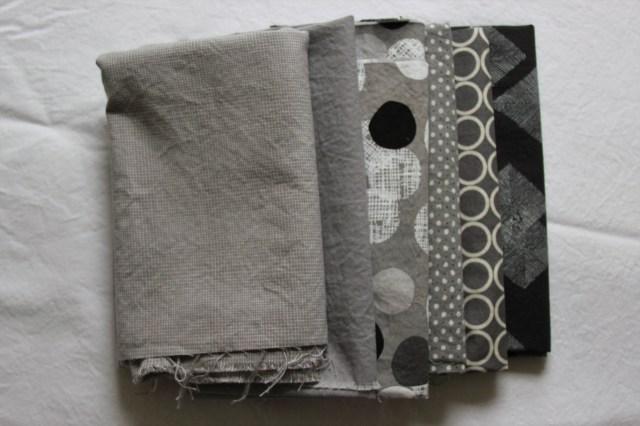 the grays I am using
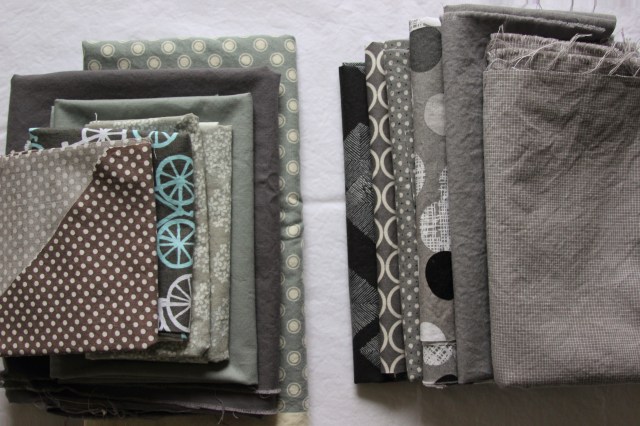
 examples of grays from my stash that didn’t work – either wrong color (the gray/white polka dots are way too blue) or wrong design (those bikes are a nice gray but the print has blue in it too)
In real life, these two piles look very different but they were super difficult to photograph (even when playing with warmth, saturation, etc during editing). So I hope the side by side comparison helps a bit. The blues on the left are either too blue/green or too pink to work (plus the one with flowers – no thanks!).
For the two accent colors, I’d like bright green and bright orange, matched to these two colors if you can:


So, in summary, you’ll need four grays, plus green and orange.
Color Placement
In the interest of helping the repeating pattern really show itself, I’d like the darkest gray to be on A1 and the lightest gray to be on A5. For the accent colors, please make A3 orange and A5 green. When I sewed my sample block, I wrote a description of each fabric directly onto the template to ensure I put the correct fabric in the correct place.

I wrote on all four templates as you can see, and then lined them up before sewing, just to make sure that I had written the colors correctly. A little anal perhaps but I hate making mistakes and seam ripping with paper-piecing is a HUGE pain!
Some paper-piecing tips:
Alyce has a great paper-piecing tutorial so definitely read that if you’re new to paper piecing. And please, pay particular attention to measuring the template after you’ve printed it. When I first printed it, even though I thought I’d told the printer to print the correct way, it still shrunk it a bit. So be sure your template measures 6.5″ before you start sewing. Remember to print 4 templates!
This blog post has a couple introductory videos if you want a paper piecing visual. I don’t agree with her assertion that you have to use fancy paper. I just use plain old copy paper and it works fine! (And Carolyn Friedlander agrees with me – she’s the one who told me to use it when I took her class last spring!) I also don’t bother pre-perforating my lines. Just the actual sewing makes the paper plenty easy enough to rip out. I do pre-crease all my lines before I start sewing though. That way, I don’t have to stop after every seam to crease the next line.
A few other thoughts:
1. As Alyce and Carolyn recommend, I use cheap copy paper and don’t have any issues with it other than when ironing open seams after joining sections. The ink usually smears so I use a press cloth to keep the ink on the press cloth and not on the iron (and consequently my block).

2. I don’t use the printed seam allowance as my guide for the edge of the block. Rather, I cut that off a bit (with scissors in advance) and then use my ruler to add a 1/4″ just like I do for all other seams in the block.
 looks off but it’s correct because I cut down the paper before sewing!
3. When joining sections, Wonder clips are your best friend! Also, I first join the section using my longest stitch (which is a 4 on my machine) and then check to see that the sections are lined up correctly and that the back line is correct also. If it’s lined up correctly, then I just go back to my usual paper-piecing stitch length (1.5) and sew back over the seam to finalize the seam. If it’s off, the long basting stitch is really easy to remove from the fabric without ripping the paper.


looks pretty good!
4. When the instructions say, “Remove paper from the seam allowance”, it means remove the paper from the SA after you’ve joined two sections. (This didn’t make any sense to me until I started.
 paper gone from the seam allowance (on both sides)
5. After I make the final seam to join all sections in a block, I remove all my papers before ironing that final seam. I find it a lot easier to get the last seam ironed accurately with the paper gone (plus you don’t have to worry about ink smearing).

6. I know some people like to keep the papers in their blocks until the whole quilt is pieced but I do NOT. So please, pretty please, take out all the papers before sending your block to me. It will be easier for you to mail and so much easier for me when completing my quilt top!
7. Finally, this block produces a lot of fun tiny triangle scraps. If you don’t want them, I’d love it if you send yours along to me. I have thoughts of trying to make something out of them.

And now that I’ve totally overwhelmed you with way too much information for one little block, I hope you have fun sewing! Thank you SEW much! 🙂