
I must admit to more than a little bit of trepidation in sharing this sourdough bread recipe with you. In fact, I’ve been putting it off for a year. I’m a relative amateur when it comes to sourdough baking and I’m sure (I know!) this recipe has flaws on many levels. As you’ll see in the pictures, it’s not even that pretty. BUT…it is really tasty and is so easy to make. It probably only requires around 10 minutes or less of hands-on-time and has made it possible for me to make all of our bread without that much fuss. This bread is at its best either just cooled out of the oven or when toasted. We slice it, freeze it and toast it for breakfast almost every morning.
It’s a very sour sourdough, which I love. I also love that my kids eat it with relish. It tells me that we haven’t totally ruined their taste buds with sweet things yet. We’re aiming for sophisticated taste buds and although we certainly haven’t gotten there yet, at least with this bread, the kids are doing well! It’s a very hearty, dense bread (being 100% whole wheat and sourdough) but, especially when toasted, it’s surprisingly easy to eat.
So, if I haven’t scared you off already, here’s an amazingly easy recipe for making 100% whole wheat sourdough bread. The amounts are easy enough to remember that you’ll memorize it soon enough and won’t even need this recipe to make it!
100% Whole Wheat Sourdough Bread
recipe developed by Laura through much trial and error, initially inspired by this one
Step 1 – Refresh/make enough starter. See this post for directions.
Step 2 – Once you have enough starter, make bread!
Put your mixer bowl (or large bowl if you don’t have a stand mixer) on the scale to do this and zero after each addition:
550 g sourdough starter
250 g water
525-600 g whole wheat flour (see this post for clarification on the amount of flour)
1 T salt (I use fine grain sea salt.)
 note that I don’t even bother to clean my bowl between batches!
Mix with a spoon until roughly combined.

Put your bowl in your stand mixer with the dough hook and let it knead for 10-15 minutes until it is well combined and smooth. The dough should be clearing the sides of the bowl but still slightly sticky. A moist dough is better than a too stiff dough. Alternately, you can knead it by hand.
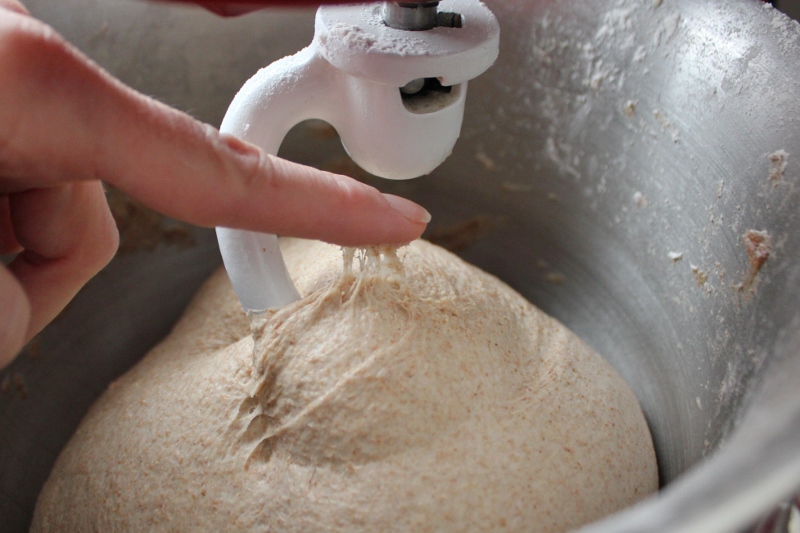 This is bagel dough (recipe to come in a few weeks), not this bread dough. However, the stickiness of this dough, when finally kneaded is about what your sourdough bread should be like. The dough is uniformly smooth and still sticky to the touch.
Step 3: Bake It.
Option 1: If you are feeling particularly lazy (or short of time), put the dough directly into a generously-greased Dutch oven. (Mine is a six-quart – a bit more on that at the bottom of the post.). Press it out until it relatively evenly covers the bottom of the pan.
 how it looks when doing the ultra-low-effort option 1 (and don’t judge me for my well-used but not so pretty any more Dutch oven)
Option 2: If you feel like you can take an extra 5 minutes (and sometimes I can’t), pretend the dough ball is one huge roll and shape into a cohesive ball. I pull the sides of the dough underneath to form a tight ball on top. This helps the final loaf look a bit more pretty but doesn’t affect the final flavor. Put the dough ball into the pan and press it out until it relatively evenly covers the bottom of the pan.
 how it looks when doing the slightly-more-effort option 2
Option 3: Divide the dough in half and put it into two well-greased bread/loaf pans. Full disclosure – I’ve never done it this way so you’ll have to do your own experimenting to perfect this. I’m just including it as an option if you don’t have a Dutch oven.
For all three options: Allow to rise for several hours until it’s almost to the top of the Dutch oven. This rising time will vary widely depending on the temperature of your dough and the air temperature in your house. Generally speaking, I make the dough around 8 in the morning and am usually baking it by 4:00 or 5:00 in the evening. In the winter, it may take up to 12 hours or so. And no, as you may have noticed, there is not a second rise/shaping/proofing. This is the beauty of this recipe. You knead it, put it into pans, let it rise until it’s tall enough, and bake it. You can certainly leave your house for hours while it’s baking so the timing is flexible as well. As I said, it’s ultra-easy!
 After probably 3-4 hours of rising, it finally starts to look like it will turn into bread.
Mine generally rises until it’s close to 2-3 inches from the top of the pan. When it looks tall enough (this is the experimentation part), very carefully, without jarring, put it into your oven.
Bake in a preheated 400 degree oven for 40-45 minutes until it’s nicely browned. If you have a thermometer, I think it’s supposed to bake until the internal temperature reaches 190-210 degrees F but I never bother checking. Dump it out (usually it falls right out but sometimes it sticks and then I have to pry it out with a wooden spoon. I haven’t figured out why this happens.)
 what it looks like when baked the lazy way (option 1), ugly but still delicious (and this particularly loaf = a bit over-baked)
 what it looks like when baked the lazy way (option 2) and also baked closer to the right shade of brown. I let this one over-rise a bit so you can see that it fell a smidge on the right side, probably because I bumped it as I was putting it in the oven. Oh well! It’s still delicious with butter! 🙂
Step 4: Cut It. (It’s a bit trickier than it seems.)
This is probably a flaw of this method of baking (in a circular Dutch oven) but the slices end up being many different sizes. I like it because I give the smaller pieces to the kids and the larger pieces to the adults. If this will annoy you, you may want to choose the loaf pan route.
Let the bread cool completely before cutting. Cut the round loaf in half.

Then, working with one half circle at a time, slice the bread. I prefer thin slices because I like my butter to bread ratio to be higher on the butter side! For this bread, I don’t use my bread knife. Instead, I use our meat carver. The angled tip on the end makes it easier to cut through the bottom crust. So try a couple different knives if you’re finding that your bread knife isn’t working well enough.

Let me know if you try baking this!
**********
Our Dutch oven is a Calphalon, which is fine, but they don’t appear to make it any more. Cooks’ Illustrated recommends this Lodge Cast Iron Dutch Oven. Make sure to look through the colors. Some of them are much cheaper than others. If you don’t mind emerald green, you can save yourself a few bucks!

Pingback: Why Sourdough? Why Soaked? Why Even Bother? | Salmon and Souvlaki
Pingback: Caution: Disastrous Results Ahead | Salmon and Souvlaki
Pingback: I Promise My Sourdough Recipes Taste Better Than This | Salmon and Souvlaki